Friday, May 28, 2010

A Leafy Green Meal Plan

It has been a fun challenge to figure out how to fit all these greens that we have been growing into our meals. To begin with, I wash and rinse greens every day and that is quite a process. I've learned that taking the rib out of collards, kale and turnips make them a lot easier to eat--especially for the girls. Another thing I've figured out is that it is more efficient to go ahead and prepare all of the greens at once. For example, in the past I would only wash the kale that I would be using for the specific meal. Now if I wash and trim all 2 pounds at once then dinner prep is quick and we have left over greens that we can eat the next day.

So this is how I do it now. First I cut out the rib if necessary. Then I let them soak in a sink of cold water for about 10 minutes. Then depending how dirty the leaves are I might do that again. I then take them out (inspecting for bugs on each leaf since I am neurotic about not eating bugs) and dry them in the salad spinner. Then I bag them in a clean bag so they are ready for the meal.

I've never really cooked with bok choi before this year. I've found that the stalks can be used just like celery. I chop them up and add them to salads, sandwiches and cold salads like potato salad and chick pea salad.  If you are going to cook them with the leaves then they need to cook about twice as long (cook ribs 3 min. then add leaves for another 3).


Here's a meal plan for a typical week during this season:

Sunday--Spicy Chick Pea dish and salad
Monday--Tofu and sauteed kale lasagna and salad
Tuesday--Burritos with black beans, rice, sauteed collards, olives, avocados, salsa and vegan sour cream on top
Wednesday--Harvest bowl with cornbread, leftover black beans, mashed potatoes and turnips, and avocado.
Thursday--Coconut milk and curry stir fry with tofu, bok choi, mushrooms and salad
Friday--Cashew cheese macaroni with sauteed swish chard
Saturday--Cold chick pea salad sandwiches

Wednesday, May 26, 2010

Watering your summer garden

Summer Gardening

Water is one of the most important components in a healthy garden. Water is critical for plant growth as well as for the broader soil community. And, fluctuations in moisture levels in the soil can cause real problems for garden plants. So, as gardeners interested in maximizing garden potential we ought to reflect on how to water and what we can do to preserve water in the soil.

I can’t emphasize enough what volatility in soil moisture will do to plant growth. Garden plants, with a few exceptions, do best with consistent levels of moisture in the soil. Extremes are to be avoided. Consistent moisture becomes harder to maintain in the scathing summer sun. Some evidence suggests that plants have various “modes”: growth mode, fruiting mode, and yes believe it or not survival mode. A plant will enter survival mode when it encounters conditions antithetical to growth or fruiting. If the plant is growing it may stop, once stunted it may recover after much effort, but may also remain stunted throughout the summer. If fruiting a plant may drop fruit prematurely in order to conserve energy when entering survival mode. The plant then must pour much energy and resource just to switching back into growth and fruiting modes thus delaying harvest. We want to keep our plants growing consistently and steadily and one of the greatest threats to such growth is volatility in moisture levels. If a plant begins to struggles to live it will attracts diseases and pests. Once weakened, the garden buzzards are waiting to pounce.

Remember this: we gardeners can be a thrifty bunch. That’s why many of us garden. But, one can’t be thrifty with garden plants. They will demand proper conditions or refuse to perform optimally. Below are a few reminders for maintaining consistent moisture levels in your garden soil. If you have other ideas that have worked well we’d love to hear them. Send us a note:

  1.  Soil rich in compost holds much more water than sandy soils. If your soil is sandy consider adding a supply of compost. Here in Columbia the city sells compost from the yard waste it collects in town. This compost can be bought in much larger quantities for much cheaper prices than conventional stores. Check to see if large cheap quantities are available in your area. Rich soil is certainly the best preventative measure.
  2. Mulch: Hardwood mulch is excellent for preserving moisture in the soil. But, wood chips decompose slowly. Some argue that the fungal decomposition that wood chips require actually removes nitrogen and other resources from the soil. So, we don’t recommend putting wood chips in the garden soil although we have read reports of people applying it topically with some success. But, if you have fixed beds hardwood mulch makes a great cover for paths. I dump it in large shovel-fulls around the beds and anywhere I will be walking. The mulch then provides water retention and slowly decomposes enriching the surrounding soil. I’ve noticed red wigglers live in hardwood mulch rather readily especially if there is easier decomposing material nearby. Also, mulch is free for us. We have a good relationship with a tree trimmer who, after a quick call, will be by to dump a huge load of mulch in our driveway. Free is great. If your interested in wood mulch call a tree trimmer. They generally have to pay to dispose of wood chips. They may be happy to drop it off to you instead.
  3. Wheat straw/hay: Wheat straw is a wonderful cover for garden plants. It shades the soil and can be placed right around stems. We buy wheat straw bales from Lowes/Home Depot type stores, strap it to the roof of our car and store it in the backyard. Wheat straw is useful to have for vermicompost and compost bins as well. The only caution with wheat straw is that it attracts pill bugs, crickets, and slugs. Slugs can do a load of damage if their populations get out of control. But if you find you can’t water enough in the summer try a bale of wheat straw and shake a nice six inch layer of straw around mature garden plants.
  4. Take advantage of vining plants with large leaves. American Indians are reputed to have grown squash around their corn in order to provide moisture protection and take advantage of otherwise unusable space. If you are growing watermelon, sweet potatoes, vining squash, etc. in a compact urban garden direct those vines in between other taller plants and allow their large broad leaves to provide some garden shelter.
  5. Water regularly and heavily. It’s always interesting to water, then put one’s finger in the soil, and check to see the depth of the saturation. I am usually surprised at how shallow the moisture is. Water deeply. The deeper the water soaks the longer it remains in the ground available to plant roots. Quick watering will keep plants perked up, but also cause their roots to remain shallow. This will cause trouble when the high summer sun begins to bake that soil.

Till next time…Keep gardening!

Sunday, May 23, 2010

Pests: Squash vine borer

Every year that we have planted yellow and zucchini squash we have had problems with the squash vine borer. The moth (pictured below) lays its eggs on the vine or under the leaf of squash plants. When the egg hatches the grub moves into the vine and feeds on the inside of the plant. Most of the time you don't realize the grubs are there until it is too late. One day you walk out and see your beautiful plant fallen over on its side.

Here's a picture of the inside of the stem. If you look closely you can see the small white grubs with black heads. Those are the pests!


The eggs are so tiny but if you look hard on the base of the plant you can see them.

Once the grub is done eating it moves under ground to complete its life cycle and later emerges as a moth. 

We have tried several things to get rid of the pests. Two years ago, we ordered some beneficial nematodes from Planet Natural that we applied to the soil. The nematodes attack and hopefully destroy or at least decrease the population of grubs that are in the ground. This year we will be applying BT to help fight the tiny pests. BT (Bacillus Thuringiensis) is a safe alternative to regular pesticides and insecticides. Agorganics has a great article on the benefits of using the product. You can find BT locally at garden centers or order it online.

Another way to try to find the bugs is to carefully cut into the stem of the plant and dig out the grubs. If the stem is not damaged too much the plant will survive.

Some people I talk to have completely given up growing these summer squash. Well, we haven't done that yet. We are growing a few this year. The good thing is that even if your plants become infested with the bugs you can usually get some fruit before total destruction.

We have found that butternut squash are not as susceptible to the pests. Another winter squash that our seed catalog claims to resist the vine borer is trombone squash. We are growing those for the first time this year.


Wednesday, May 19, 2010

Beautiful Spring Harvest

It's that time of year again. We are bringing in tons of greens. For example, one day this week I went out at about 11:00 am and picked a handful of lettuce, baby bok choi, sweet peas, radishes, and green onions and mixed it all together for a salad for lunch.


We ordered a scale to keep track of the amount of veggies we bring in. We keep it on the counter and weigh everything before putting it away. We are keeping record of it all on a clip board for now but I plan on charting it as we get in more food.

For the first weigh in we measured 11.5 oz of spinach, 26 oz of sweet peas, 9 radishes, 22 oz lettuce, 15 oz baby bok choi, 1.5 lbs of bigger bak choi, 1 lb young turnip greens.

And our spinach is huge.


We loved looking at it so much we just had to take a picture! Is it  because of the compost tea?


This is the bak choi bed. This is an asian green that we use just like the other greens--in stir fries, steamed or chopped really thin in salads. We like it because it is a more heat tolerant than salad greens and more tender than traditional southern greens.


Here's the lettuce bed.


I got a new lens for my birthday and tried it out on some flowers from the yard. These are daisies that we planted last summer. Beautiful, right?


Tuesday, May 18, 2010

Spring Gardening (April)

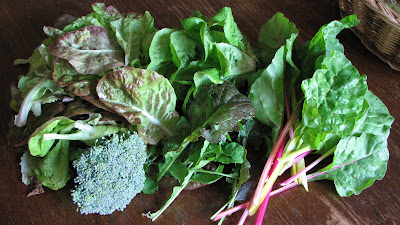
I love this time of year. I get to harvest fresh salads and greens every morning! I take my basket outside and pick the biggest heads of butter crunch and red leaf, a few leaves of chard, kale, or collards, some mesculin mix, and a head of broccoli (that's what's pictured below). We should have enough planted to do green harvests like this for another month. I store all this in the fridge for the day then wash and prepare with dinner tonight. I'll add some nuts, fresh green onions, and oil and vinegar. Yum!The winter/spring garden is nice because there aren't as many bugs and pests out yet. The onions, potatoes, and garlic don't require much water or extra feeding. Basically they go in the ground and we don't really worry about them till harvest which should be coming soon.

This is just a picture of another harvest from a few days ago. Being in the garden with all the colors, textures, and sounds is such a nice way to start the day!
This is a portion of the broccoli bed which is growing nicely.
Here's a row of lettuces, cabbage, brussel sprouts, broccolli, and onions.
Lettuce up close.


Originally posted April 27, 2009

Friday, May 14, 2010

A Mother's Day Harvest and Summer Planting


As I mentioned in an earlier post we are keeping track of all the produce we harvest by weighing it and charting it on a clip board in the kitchen. Here is the harvest amounts from Sunday.
  • 1.5 lbs collards
  • 1 lb 4 oz kale (lacinato)
  • 2.5 lbs lettuce (butter crunch and green leaf)
  • 10 oz spinach
  • 4 oz peas
  • 1 lb 4 oz radish (or about 10)

Now you might be wondering what we do with all these greens! Stay tuned for recipes and ideas. Believe it or not by Wednesday night we have already gone through everything but a few ounces of lettuce and collards.


On Sunday, we also planted most of the summer veggies that we started from seed including zuchinni, yellow squash, trombone squash, cucumber, pole beans, cantelope, eggplant, basil, more Swiss chard and bok choi. I re-potted the tomatoes since we have to wait for garden space to come available. Okra, bush beans, sweet potatoes, and watermelon are still waiting to be planted.

Wednesday, May 12, 2010

Spring Gardening (May) Harvest

Here's another harvest from earlier this week. We are definitely eating enough servings of greens these days!
I mentioned that we'll be getting greens like this for a month. I want to clarify that it won't be exactly like this for very long. We are noticing that the broccoli is already flowering and some of the lettuce is already beginning to bolt, but we will be able to harvest other lettuce (planted in shady spots in the garden), kale and chard for some time.


I am a little surprised that the broccoli didn't last longer.  Both the broccoli and the lettuce that bolted were bought as seedlings from Lowe's so I'm not sure what varieties they are. Most of the lettuces that we ordered from Cook's Garden and started from seed are still growing and doing fine.

I took some more pictures of the garden for this week. These next two pictures were taken from the same spot. The one below is mostly cold season stuff -- lettuce, chard, kale, cabbage, brussel sprouts. We took up the broccoli salad greens that we had in the back left corner. They were attacked by flea beetles and never really formed any kind of broccoli-like head. Then, we put down some collard seedlings we started a while ago. Then, they were attacked by what we think were the flea beetle larvae. We found little black wormy caterpillar looking things eating the collards leaves. We tried to save them with diatomaceous earth but I think it was too late. There are a few collards left in that spot, and we put some hot peppers in with them. The peppers haven't been bothered by the beetles yet.

The next photo is of the middle three rows which are the classic summer veggies. The cukes, eggplants, tomatoes, squash,  basil, and cantelope were started from seed indoors. The bush beans and okra we direct seeded after the frost date. Things are looking pretty nice so far.  To the right of this picture are the onions, potatoes, garlic, lettuce and peas.
Here's a picture of the damage done by the flea beetles. These are baby eggplants that we started indoors. They are about 4-6 inches tall now. We also bought some bigger eggplant last weekend just in case we lose these guys.
We are using diatomaceous earth to control the flea beetles and it works really well. This organic treatment was recommended to us by our friends at Five Leaves Farm (the local CSA). It is a white powder that you can sprinkle on and around plants to keep any kind of small creatures/pests away. I've heard it being used for slugs, beetles, fleas, and even roaches around the home. It is made of the skeletal remains of tiny unicellular plants that are very sharp to a tiny pest. This is the first year that I've seen it at Lowe's hardware and you can also find it at a local nursery or seed and feed.

Below is our newly planted bed of peppers. Since we were only able to get a few peppers to grow from seed indoors we bought 4 different kids of pepper plants last weekend. We planted them here in this bed where we had winter greens. There are pole beans and snow peas growing up a trellis on the porch behind them.
Lastly, this is a bed of butternut squash and pole beans. I've also planted some seminole pumpkin seeds in the middle. We've never grown these pumpkins but a friend suggested them after having success with them last year. These pumpkins and the butternut squash are supposed to be less susceptible to the vine borer bug. We are hoping to win the battle against squash vine borers in this bed this year!


Originally posted May 5, 2009

Saturday, May 8, 2010

Checking the temperature of one our compost piles

We always have a big compost pile in the back corner of the yard. This time we started the pile with mostly horse manure and leaves from other people's yards. After turning and watering it we tracked the temperature every day. The first day after turning it was 80 degrees (same as temp. outside). The next day it was about 90, then the next day 100-110. The temp steadily increased and by the 4th day it was at 140. We were very excited!We will turn it again soon. I should post a more detailed description of composting or at least what we do in case anyone reading would like to start one. Here is a great article I read online that can get anyone started turning their yard and kitchen waste into "gardener's gold." Of course you can find books all about it at your local library too :)


Originally posted May 11, 2008